26.06.2020, 07:52
(
Last edited by SkyFlare; 27/06/2020 at 12:07 AM.
)
Creating A Menu with a Dialog
Syntax for Dialogs
PHP Code:
ShowPlayerDialog(playerid, **DIALOGID**, **DIALOGSTYLE**, "**DIALOGTITLE**", "**DIALOGBODYCONTENT**", "**LEFTBUTTONTEXT**", "**RIGHTBUTTONTEXT**");
DialogStyle - This is a multi choice depending what kind of Dialog Style you need or want, you will learn about these in this tutorial.
DialogTitle - This goes on the Dialog at the top, as the Title shown.
DialogBodyContent - This is what is in the middle of your Dialog, weather that is Text,Numbers,Items etc, you will also learn how to create Listitems in this tutorial.
Left & Right Button - This is to make your Dialogs Responsive and do different things, adding extra dialogs to open after you click it, or do certain tasks.
Setting Up Framework for Dialogs
We will use an Enumerator for this, so we don't have to constantly define numbers and have a possibility of forgetting DialogID's along the way.
If you don't know how to use an Enumerator, there is a great Article about this already.
https://sampforum.blast.hk/showthread.php?tid=318307
PHP Code:
enum

{

    DIALOG_UNUSED

};
What is DIALOG_UNUSED? This is basically DIALOG ID 0, we are using this as a placeholder and I will explain why.
Say you have your Help Command, which just shows all the available CMD's on your server, but it doesn't do anything else when you click the Menu Buttons on the Dialog? That mean's we wont need to use OnDialogResponse Callback's features for that Dialog, and if there is any more Dialogs you have, that have no functions with the buttons, you also wont need OnDialogResponse's Features, therefore you're able to use the same Dialog ID, so we can just use DIALOG_UNUSED like this
Code:
ShowPlayerDialog(playerid, DIALOG_UNUSED, DIALOG_STYLE_MSGBOX, "Messagebox Title 1", "This is Information inside the first Messagebox", "Ok", "");

ShowPlayerDialog(playerid, DIALOG_UNUSED, DIALOG_STYLE_MSGBOX, "Messagebox Title 2", "This is Information inside the second Messagebox", "Okay", "");

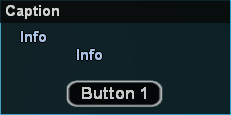
This is a MessageBox, You can fit a lot of text into these, It's useful for Help Commands such as /ahelp or /help
or even /stats or whatever feature you want, like maybe even Text Messages in a Roleplay Gamemode?
Literally your Imagination will be the limit of this Dialog's Usage.
So lets create one!
First we should have another look at that Enumerator
PHP Code:
enum

{

    DIALOG_UNUSED

};
PHP Code:
enum

{

    DIALOG_UNUSED,

    DIALOG_HELP,

    DIALOG_HELP2

};
NOTE: I am not creating a tutorial on CMDS and Processors, this is ZCMD Format, if you can't understand it then I suggest you go study it a little.
PHP Code:
CMD:help(playerid, params[])

{

    ShowPlayerDialog(playerid, DIALOG_HELP, DIALOG_STYLE_MSGBOX, "Help Page 1", "This is Page 1 of the Help Messagebox", "Page 2", "Exit");

    return 1;

}
First I would like to mention, using Switches is the best method here, youll have less confusion with your code and switch brings some great benefits and in some cases less code to actually write.
And theres been mention if youre running filterscripts with dialogs in them, that when youre coding your dialog response you should be returning 0, ill quote something here for you guys.
Quote:
|
OnDialogResponse
"Returning 0 in this callback will pass the dialog to another script in case no matching code were found in your gamemode's callback. It is always called first in filterscripts so returning 1 there blocks other filterscripts from seeing it." |
So lets do our response for our help command we created.
PHP Code:
public OnDialogResponse(playerid, dialogid, response, listitem, inputtext[])

{

    switch(dialogid)

    {

        case DIALOG_UNUSED: return 1; //This is the Empty Dialog that isn't used as I previously mentioned.

        case DIALOG_HELP://This is our Help Dialog called from CMD:help

        {

            if(!response) return 1;//This is the Exit Button we made, the right side Button

            else if(response)//This is the Page 2 Button we made, the left side Button

            {

                //We want to show the Page 2 Dialog now that they have pressed the Help Page 2 Button

                ShowPlayerDialog(playerid, DIALOG_HELP2, DIALOG_STYLE_MSGBOX, "Help Page 2", "This is Page 2 of the Help Messagebox", "Page 1", "Exit");

                return 1;

            }

        }

        case DIALOG_HELP2://This is our Page 2 Dialog Response, called from DIALOG_HELP Button

        {

            if(!response) return 1;//This is the Exit Button we made, the right side Button

            else if(response)//This is the Page 1 Button we made, the left side Button, to take us back to the Page 1 Dialog

            {

                //We want to show the Page 1 Dialog now that they have pressed the Help Page 1 Button

                ShowPlayerDialog(playerid, DIALOG_HELP, DIALOG_STYLE_MSGBOX, "Help Page 1", "This is Page 1 of the Help Messagebox", "Page 2", "Exit");

                return 1;

            }

        }

    }

    return 1;

}
and if we click the "Page 1" Button, you'll be directed back to the 1st Page of Help.
Things to note: You can add new lines in a Messagebox by writing "\n" within the Text for the Messagebox Content, See Below as an Example.
PHP Code:
ShowPlayerDialog(playerid, DIALOG_UNUSED, DIALOG_STYLE_MSGBOX, "Line Testing", "This is Line 1\nThis is Line 2\nThis is Line 3", "Ok", "");
DIALOG_STYLE_INPUT

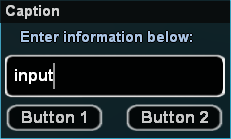
This is an Input Box, This can be used for many different things, Setting a Skin ID, by typing it into the Dialog Input, anything to do with Numbers really, or even Strings!, changing a players name can be done here aswell!
SOoOoO let's create a Name Change Input Box!

First off, we will add a new DialogID into our Enum, name it DIALOG_CHANGENAME
PHP Code:
enum

{

    DIALOG_CHANGENAME

};
PHP Code:
CMD:changename(playerid, params[])

{

    ShowPlayerDialog(playerid, DIALOG_CHANGENAME, DIALOG_STYLE_INPUT, "Change Name","Enter your new desired Name you wish to use:","Change","Exit");

    return 1;

}
So let's do that now!
PHP Code:
public OnDialogResponse(playerid, dialogid, response, listitem, inputtext[])

{

    switch(dialogid)

    {

        case DIALOG_UNUSED: return 1; //This is the Empty Dialog that isn't used as I previously mentioned.

        case DIALOG_CHANGENAME://This is our Changename Dialog called from CMD:changename

        {

            if(!response) return 1;//This is the Exit Button we made, the right side Button

            else if(response)//This is the Change Button we made, the left side Button

            {

                if(!strlen(inputtext) || strlen(inputtext) > 24) return SendClientMessage(playerid, -1, "Name Changing requires the name to be of a length between 1-24");//This checks if they typed nothing or too much.

                //We want to Change the Players Username based on what they typed in the Box earlier since we now know its between 1-24, so we use "inputtext" for that again.

                SetPlayerName(playerid, inputtext);//This will change the players name based on what they wrote in the Input Dialog.

                SendClientMessage(playerid, -1, "You have successfully changed your name, enjoy!");

                return 1;

            }

        }

    }

    return 1;

}
DIALOG_STYLE_LIST

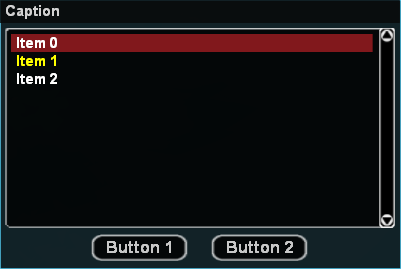
This is a ListBox, personally my favorite of them all, because of how Dynamic this can be, and its functions, so much use within this 1 Dialog type that it's hard for me to pick a Feature to use for the Tutorial, Teleport List? Yeah lets do it.
So again, we need that Enum to have our new Dialog ID, name it DIALOG_TELEPORTS.
PHP Code:
enum

{

    DIALOG_UNUSED,

    DIALOG_TELEPORTS

};
PHP Code:
CMD:teleport(playerid, params[])

{

    ShowPlayerDialog(playerid, DIALOG_TELEPORTS, DIALOG_STYLE_LIST, "Teleport","Los Santos\nSan Fierro\nLas Venturas","Teleport","Exit");

    return 1;

}
"Los Santos" will be now on its own line, and when we click only that line, its response would be different than "San Fierro" or "Las Venturas"
they basically get split up into a ***LIST***
 Simple right? sure is!
So if we go ingame, yet again we can use the Command associated with our new Dialog Type, /teleport, we can click all 3 but nothing will happen because again OnDialogResponse needs to be coded for it, so lets get going with our response code.
PHP Code:
public OnDialogResponse(playerid, dialogid, response, listitem, inputtext[])

{

    switch(dialogid)

    {

        case DIALOG_UNUSED: return 1; //This is the Empty Dialog that isn't used as I previously mentioned.

        case DIALOG_TELEPORTS://This is our Teleports Dialog called from CMD:teleport

        {

            if(!response) return 1;//This is the Exit Button we made, the right side Button

            else if(response)//This is the Teleport Button we made, the left side Button

            {

                switch(listitem)//This is switching ListItems, self explanatory BUT this is smart, them "\n" we added play the role on determining how many List Items we have.

                {

                    //We always start with "0" which is essentially the First List Item from the top.

                    case 0://Los Santos Teleport

                    {

                        SetPlayerPos(playerid, 1532.0996,-1675.6741,13.3828);

                        SendClientMessage(playerid, -1, "You've teleported to Los Santos");

                        return 1;

                    }

                    case 1://San Fierro Teleport

                    {

                        SetPlayerPos(playerid, -2649.0630,21.0362,6.1328,357.6369); // San Fierro

                        SendClientMessage(playerid, -1, "You've teleported to San Fierro");

                        return 1;

                    }

                    case 2://Las Venturas Teleport

                    {

                        SetPlayerPos(playerid, 1687.0597,1446.8789,10.7688,275.8561); // Las Venturas

                        SendClientMessage(playerid, -1, "You've teleported to Las Venturas");

                        return 1;

                    }

                }

            }

        }

    }

    return 1;

}
DIALOG_STYLE_PASSWORD

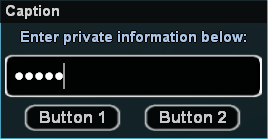
This is a Password Input, exactly the same type of Input Dialog as the standard Input one we used to change our name, but this one simply covers the password with the
hidden character, during input... using this is exactly the same as DIALOG_STYLE_INPUT.
Create one and see for yourself, you'd use this specifically for a password screen.
PHP Code:
ShowPlayerDialog(playerid, PUTDIALOGIDHERE, DIALOG_STYLE_PASSWORD, "Password","Things you type here will be shown as a password:","Ok","");
And that concludes the Tutorial, I seen a few different Tutorials for Dialogs, I even created one myself a few years ago, however that was in 2012 and I wasn't as smart as I am now, so reiterating on it, with switches and decent examples of usage, hopefully this helps someone, it's good to know how to use these, even with all the Textdraws nowadays I still personally prefer Dialogs, feel free to comment any ideas for another Tutorial if you guys need help with something else.


 Glad this will be of use.