05.04.2012, 00:11
(
Последний раз редактировалось Drebin; 05.04.2012 в 21:42.
)
Intro
With this thread I will try to help you on how to replace the texture on an object and make you understand how it works.
SetObjectMaterial has 6 parameters:
The best way to find the name and the directory of a texture is by using JernejL's Map Editor. I will build my tutorial on this program. I strongly recommend you to use it
Getting started
First of all you have to decide which texture you want to put onto the object and which object carries this texture. I decided to take the texture of object ID 19341, which is an egg object with stripes on it (added in 0.3d). We will now start to build up our function step by step.
Our first parameter is the objectid. You simply put the ID of the object you want to change here:
Next is the materialindex. Now you need to open JernejL's Map Editor and create the object you want to change the texture of, in my situation it'd be the obelisk from LV (ID 8397). When you created the object, doubleclick it.
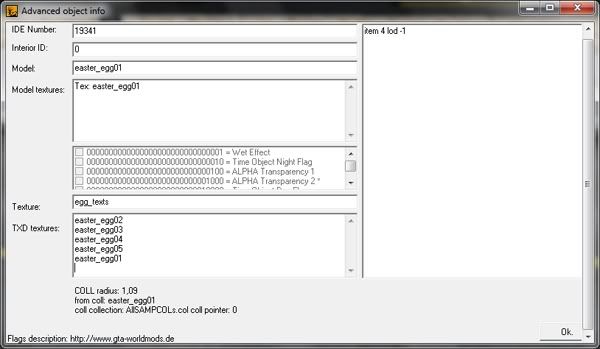
You now see a window with infos on the object ID. The important thing for now is the "Model textures" box.

This box shows all textures an object has. You now have to decide on which texture you want to change, I pick the first texture in the list, which would be the index 0. Now we add this to our function:
If you want to change the second texture, your index would be 1. Some object only have one texture on them, which makes it pretty easy for you, because then the index is always 0.
Next is the modelid. This is simply the model ID of the object which has the texture you want to put on your new object on it, in my situation it's the ID of the egg (ID 19341). We complete:
Now we have to find the txdname. For this we use our map editor again. Create the object with the texture you want (NOT the object which you want to change the texture of, now you need the object which has the texture alredy on it) and doubleclick it.

Now look at the box beside "Texture". This is the file the texture you want is saved in, for me it is "egg_texts".
For the next step you simply have to look at the box below it, right beside "TXD textures". These are the different textures that are inside the texture file you just found out ("egg_texts" in this example). You now have to pick the name of the texture you want to put on your object. Which name the texture you want has can not be said, the only way to find out if you picked the right texture name is by trying it out. I pick texture "easter_egg01"
Our function now looks like this:
The next and last parameter is the colour you want to paint the texture as, in a ABGR value (NOT RGBA). I pick 0 because "0" keeps the original colours of the texture.
If you want to convert colours in RGBA format (used in SendClientMessage for example) to ABGR, you can use this function (made by Kar):
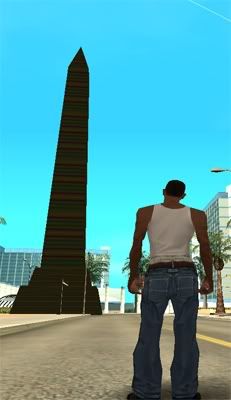
If you did nothing wrong, your object should now have a new texture. My obelisk (ID 8397) has now the texture of an egg (ID 19341)

I hope you now understand how this works. This tutorial isn't supposed to show you perfectly what to do, I made it so you know where to search for the parameters . And I hope you're not more confused than you were before
~Drebin
With this thread I will try to help you on how to replace the texture on an object and make you understand how it works.
SetObjectMaterial has 6 parameters:
| objectid | The ID of the object you want to change the texture of |
| materialindex | The index of the part of the object you want to change |
| modelid | The ID of the model which shoulders the texture |
| txdname | The name of the .txd file in which the new texture is saved in |
| texturename | The name of the new texture |
| materialcolor | The colour the texture should have |
Getting started
First of all you have to decide which texture you want to put onto the object and which object carries this texture. I decided to take the texture of object ID 19341, which is an egg object with stripes on it (added in 0.3d). We will now start to build up our function step by step.
Our first parameter is the objectid. You simply put the ID of the object you want to change here:
pawn Код:
new myobject;
myobject = CreateObject(8397, 2067.94, 1362.22, 19.90,   0.00, 0.00, 0.00);
SetObjectMaterial(myobject, ?, ?, ?, ?, ?);
You now see a window with infos on the object ID. The important thing for now is the "Model textures" box.

This box shows all textures an object has. You now have to decide on which texture you want to change, I pick the first texture in the list, which would be the index 0. Now we add this to our function:
pawn Код:
SetObjectMaterial(myobject, 0, ?, ?, ?, ?);
Next is the modelid. This is simply the model ID of the object which has the texture you want to put on your new object on it, in my situation it's the ID of the egg (ID 19341). We complete:
pawn Код:
SetObjectMaterial(myobject, 0, 19341, ?, ?, ?);

Now look at the box beside "Texture". This is the file the texture you want is saved in, for me it is "egg_texts".
pawn Код:
SetObjectMaterial(myobject, 0, 19341, "egg_texts", ?, ?);
Our function now looks like this:
pawn Код:
SetObjectMaterial(myobject, 0, 19341, "egg_texts", "easter_egg01", ?);
pawn Код:
SetObjectMaterial(myobject, 0, 19341, "egg_texts", "easter_egg01", 0);
pawn Код:
stock ShiftRGBAToABGR(&color)
{
    new r, g, b, a;
    r = (color >>> 24);
    g = (color >>> 16 & 0xFF);
    b = (color >>> 8 & 0xFF);
    a = (color  & 0xFF);
    color = (a & 0xFF) | ((b & 0xFF) << 8) | ((g & 0xFF) << 16) | (r << 24);
    return color;
}

I hope you now understand how this works. This tutorial isn't supposed to show you perfectly what to do, I made it so you know where to search for the parameters
 . And I hope you're not more confused than you were before
~Drebin


 : error 017: undefined symbol "SetObjectMaterial"