[Tutorial] Basic SA-MP & Pawn Guide - Printable Version
+- SA-MP Forums Archive (https://sampforum.blast.hk)
+-- Forum: SA-MP Scripting and Plugins (https://sampforum.blast.hk/forumdisplay.php?fid=8)
+--- Forum: Scripting Help (https://sampforum.blast.hk/forumdisplay.php?fid=12)
+---- Forum: Tutorials (https://sampforum.blast.hk/forumdisplay.php?fid=70)
+---- Thread: [Tutorial] Basic SA-MP & Pawn Guide (/showthread.php?tid=554756)
Basic SA-MP & Pawn Guide - Ygzeb - 04.01.2015
BASIC SA-MP & PAWN GUIDE

INTRO:This guide is based on other tutorials and on my own experience. It is created specially for new scripters and people who want to learn SA-MP Pawn scripting, it explains just basic scripting and how to start.
* Note: this guide is based on the state of SA-MP in the first months of 2015; if you read this later, some elements may have changed or updated.
Based on:
Nicholas tutorial
Kwarde tutorial
Wiki SA-MP
Own knowledge.
INDEX:
STARTING
Explaining each file (basic ones)CONFIGURATIONscriptfiles
plugins
pawno
npcmodes
include
gamemodes
filterscripts
announce.exe
samp-npc.exe
samp-server.exe
server.cfg
PAWN SCRIPTING
PublicsCREATING AND REMOVING OBJECTSpublic OnGameModeInit()Functions
public OnGameModeExit()
public OnPlayerRequestClass(playerid, classid)
public OnPlayerConnect(playerid)
public OnPlayerSpawn(playerid)
public OnPlayerDeath(playerid)
public OnPlayerDisconnect(playerid, reason)
public OnPlayerText(playerid)
public OnPlayerUpdate(playerid)SetPlayerPos(playerid, X, Y, Z);Dialog Function (menus & others)
TextDrawCreate(X, Y, text[])ShowPlayerDialog(playerid, dialogid, style, caption[], info[], button1[], button2[]);Message box style (sends a message to the player)
Input style (allows players to input text into the dialog)
List style (menu, show the player a list of options)
Password style (allows players to input text into the dialog without revealing it)
Map editor (1 & 2)START PRACTICINGStart using itMTA map editor
Creating objects
Removing objectsStart using itCreating Objects
Delux GTA Map Converter v2Streamer installation
STARTING:
First we must download the SA-MP Windows Server from SA-MP.com
After doing this we will open the files contained in the download and after decompressing it, we will see our server files & folders...
Basic files & folders:
scriptfiles, plugins, pawno, npcmodes, include, gamemodes, filterscripts, announce.exe, samp-npc.exe, samp-server.exe & server.cfg
Other files:
Text files that include terms & a configuration guide (samp-license.txt & server-readme.txt respectively).
Explaining each file (basic ones):
scriptfiles: this folder contains information called inside your script or logs created by your script, usually used as a database.
plugins: this folder contains additional codes that give more options in SA-MP programming, usually programmed in other languages. This guide will not give detailed information about plugins as they are more advanced.
pawno: contains the basic program to start scripting in SA-MP; also has the "include" folder that contains basic includes to start our script (SA-MP basic functions). We can also add our own includes and add them to our script.
npcmodes: this contains information about NPCs (script & rec); this guide will not give detailed information about NPCs as they are more advanced.
include: this contains codes that can be included inside your script.
gamemodes: contains basic gamemodes and we must place our gamemode if we create one.
filterscripts: contains additional codes apart from your gamemode, not included in it and can be called by using rcon commands.
announce.exe: this will allow us to show our server on Masterlist.
samp-npc.exe: this will allow us to use NPCs.
samp-server.exe: we start our server with this.
server.cfg: our server configuration.
CONFIGURATION:
First we must open the file "server.cfg" and edit our server configuration.
After opening it, you will find:
Код:
echo Executing Server Config...
lanmode 0
rcon_password changeme
maxplayers 50
port 7777
hostname SA-MP 0.3 Server
gamemode0 grandlarc 1
filterscripts gl_actions gl_realtime gl_property gl_mapicon ls_mall ls_elevator attachments skinchanger vspawner
announce 0
query 1
chatlogging 0
weburl www.sa-mp.com
onfoot_rate 40
incar_rate 40
weapon_rate 40
stream_distance 300.0
stream_rate 1000
maxnpc 0
logtimeformat [%H:%M:%S]
Код:
echo Executing Server Config...
lanmode 0 (lan mode on "1" or off "0")
rcon_password changeme (the rcon password you will use "/Rcon login"; you must edit this)
maxplayers 50 (amount of slots available for players)
port 7777 (the port you will use, for example: 127.0.0.1:7777)
hostname SA-MP 0.3 Server (the name of your server)
gamemode0 grandlarc 1 (name of the gamemode you will use, you can add a gamemode if you create/download one)
filterscripts gl_actions gl_realtime gl_property gl_mapicon ls_mall ls_elevator attachments skinchanger vspawner (filterscripts that will be used)
announce 0 (server visible on Masterlist; "1" to show it and "0" to hide it)
query 1 (information of the server visible "1", "0" will disable your server information to other players)
chatlogging 0 (save chat logs in server_log.txt "1", not saving it "0")
weburl www.sa-mp.com (website of your server)
onfoot_rate 40 (we will not explain this in this tutorial, advanced)
incar_rate 40 (we will not explain this in this tutorial, advanced)
weapon_rate 40 (we will not explain this in this tutorial, advanced)
stream_distance 300.0 (we will not explain this in this tutorial, advanced)
stream_rate 1000 (we will not explain this in this tutorial, advanced)
maxnpc 0 (number of NPCs that can join your server)
logtimeformat [%H:%M:%S]
Configuration example (this guide is based on this configuration):
Код:
echo Executing Server Config...
lanmode 0
rcon_password Pawn
maxplayers 100
port 7777
hostname SA-MP Server [0.3z]
gamemode0 Basic 1
filterscripts gl_actions gl_realtime gl_property gl_mapicon ls_mall ls_elevator attachments skinchanger vspawner
announce 1
query 1
chatlogging 1
weburl www.sa-mp.com
onfoot_rate 40
incar_rate 40
weapon_rate 40
stream_distance 300.0
stream_rate 1000
maxnpc 0
logtimeformat [%H:%M:%S]
PAWN SCRIPTING:
After changing our configuration we will start scripting our gamemode.
In this case we will use a basic mode you can download here.
Put it inside the "gamemodes" folder.
After doing this open the pawno folder inside your server and open the file "pawno.exe".
Press "File/Open" (or just press CTRL + O) and open our basic mode, placed inside the gamemodes folder.
Inside we have this:
pawn Код:
#include <a_samp>
This message will be shown in console when we open our server with samp-server.exe:
pawn Код:
main()
{
print("Blank mode developed by Ygzeb.");
}
You can edit the text that you want to be shown in console when your gamemode starts, just editing the blue text; for example:
pawn Код:
main()
{
print("My first mode!");
}
Example:
Opening brackets = Red
Closing brackets = Green
Код:
main()
{
print("My first mode!");
}

If not there is a mistake and you need to fix it.
Publics:
Publics are basic functions called while your server is running. SA-MP counts with basic publics called in most gamemodes. Most basic public names describe when the public is executed.
Some basic publics are called in special moments, for example while spawning; you can add a function to that moment.
Example; if we want to set players health to 50 when spawning it would be something like:
* Note: we can not use identical publics in the same script; for example two OnPlayerSpawn publics; if we want to add an extra function we must add it inside the same public or inside a filterscript. Base on the last example, we will add a message while spawning:pawn Код:public OnPlayerSpawn(playerid)
{
SetPlayerHealth(playerid, 50);
return 1;
}
Here are some basic publics that are mostly used by scripters:pawn Код:public OnPlayerSpawn(playerid)
{
SetPlayerHealth(playerid, 50);
SendClientMessage(playerid, -1, "You spawned!"); // Function added.
return 1;
}
public OnGameModeInit() - Called when your mode starts.
Additional information: https://sampwiki.blast.hk/wiki/OnGameModeInit
Basic structure:
Example code:pawn Код:public OnGameModeInit()
{
// Code here.
return 1;
}
AddPlayerClass is a function that adds skin options to class selection; for example if we want to add Sweet's Skin we should add this to our code:pawn Код:public OnGameModeInit()
{
UsePlayerPedAnims(); // Allow players to run like CJ.
SetGameModeText("Blank"); // Name of your mode; will be show in SA-MP list.
AddPlayerClass(115, 1958.3783, 1343.1572, 15.3746, 269.1425, 0, 0, 0, 0, 0, 0);
AddPlayerClass(122, 1958.3783, 1343.1572, 15.3746, 269.1425, 0, 0, 0, 0, 0, 0);
AddPlayerClass(166, 1958.3783, 1343.1572, 15.3746, 269.1425, 0, 0, 0, 0, 0, 0);
AddPlayerClass(270, 1958.3783, 1343.1572, 15.3746, 269.1425, 0, 0, 0, 0, 0, 0);
return 1;
}
The number "270" is the skin ID of Sweet.pawn Код:AddPlayerClass(270, 1958.3783, 1343.1572, 15.3746, 269.1425, 0, 0, 0, 0, 0, 0);
public OnGameModeExit() - Called when your mode ends; it is not necessary in all scripts (optional in most cases).
Additional information: https://sampwiki.blast.hk/wiki/OnGameModeExit
Basic structure:
Example code:pawn Код:public OnGameModeExit()
{
// Code here.
return 1;
}
public OnPlayerRequestClass(playerid, classid) - Called when you choose your skin.pawn Код:public OnGameModeExit()
{
print("Mode ended."); // Message to console (blue text).
return 1;
}
Additional information: https://sampwiki.blast.hk/wiki/OnPlayerRequestClass
Basic structure:
Example code:pawn Код:public OnPlayerRequestClass(playerid, classid)
{
// Code here.
return 1;
}
SetPlayerFacingAngle sets the angle where the player is looking; it's structure is:pawn Код:public OnPlayerRequestClass(playerid, classid)
{
SetPlayerPos(playerid, 2294.2810, 558.2053, 7.7813); // Skin position.
SetPlayerCameraPos(playerid, 2294.3071, 560.6948, 8.7324); // Position of the camera.
SetPlayerCameraLookAt(playerid, 2294.2810, 558.2053, 7.7813); // Position where the camera is looking at.
SetPlayerFacingAngle(playerid, 0);
return 1;
}
More information about SetPlayerFacingAngle.Код:playerid = ID of the player 0 = angle (in this case north). north (0) | (90) west- -east (270) | south (180)
public OnPlayerConnect(playerid) - Called when a player connects.
Additional information: https://sampwiki.blast.hk/wiki/OnPlayerConnect
Basic structure:
Example code:pawn Код:public OnPlayerConnect(playerid)
{
// Code here.
return 1;
}
PlayAudioStreamForPlayer is a function that plays an audio stream for a player. It's basic structure is:pawn Код:public OnPlayerConnect(playerid)
{
PlayAudioStreamForPlayer(playerid, "http://s1.radio.ge/Music/AcDc/1980_Back_In_Black/06_Back_In_Black.mp3"); // Will play Back in Black, AC/DC.
return 1;
}
* Note: audio links must be in a specific format to be played; for example thislink.Код:playerid = ID of the player "http://s1.radio.ge/Music/AcDc/1980_Back_In_Black/06_Back_In_Black.mp3" = audio link
You can find music in many websites. For example in this website.
public OnPlayerSpawn(playerid) - Used after class selection, while spawning. This are the functions that will affect you when spawning.
Additional information: https://sampwiki.blast.hk/wiki/OnPlayerSpawn
Basic structure:
Example code:pawn Код:public OnPlayerSpawn(playerid)
{
// Code here.
return 1;
}
SendClientMessage is a function that sends a message to the player; it's structure is:pawn Код:public OnPlayerSpawn(playerid)
{
SendClientMessage(playerid, -1, "You spawned!"); // Sends a message.
return 1;
}
More information about SendClientMessage.Код:playerid = ID of the player -1 = Color, -1 is white "You spawned!" = message
public OnPlayerDeath(playerid) - Called when you die. This function will affect you when you die.
Additional information: https://sampwiki.blast.hk/wiki/OnPlayerDeath
Basic structure:
Example code:pawn Код:public OnPlayerDeath(playerid)
{
// Code here.
return 1;
}
GameTextForPlayer is a function that sends a screen message to the player; it's structure is:pawn Код:public OnPlayerDeath(playerid)
{
GameTextForPlayer(playerid, "Wasted", 5000, 2); // Screen message for player.
return 1;
}
More information about GameTextForPlayer.Код:playerid = ID of the player "Wasted" = message 5000 = time in milliseconds; in this case 5 seconds 2 = type of message
public OnPlayerDisconnect(playerid, reason) - Called when a player disconnects.
Additional information: https://sampwiki.blast.hk/wiki/OnPlayerDisconnect
Basic structure:
Example code:pawn Код:public OnPlayerDisconnect(playerid, reason)
{
// Code here.
return 1;
}
public OnPlayerText(playerid) - Called when a player sends a message (chat).pawn Код:public OnPlayerDisconnect(playerid, reason)
{
// Sending a message to all players that a player disconnected.
new String[64], // Variable assigned to a message. 64 is the number of characters that will be used in our message (maybe more).
Name[MAX_PLAYER_NAME]; // Variable assigned to the player's name; usually defined as MAX_PLAYER_NAME.
GetPlayerName(playerid, Name, MAX_PLAYER_NAME); // Getting the name of the player (Name) and it's length which is MAX_PLAYER_NAME (default by SA-MP).
format(String, sizeof String, "%s left the server.", Name); // Applying a format to our message.
SendClientMessageToAll(-1, String); // Sending the message to all players; String is the format we used for this message.
return 1;
}
Additional information: https://sampwiki.blast.hk/wiki/OnPlayerText
Basic structure:
Example code:pawn Код:public OnPlayerText(playerid, text[])
{
// Code here.
return 1;
}
This function is the format assigned to SendClientMessageToAll. When it is send, it will follow that format:pawn Код:public OnPlayerText(playerid, text[])
{
new Name[MAX_PLAYER_NAME], String[175];
GetPlayerName(playerid, Name, sizeof(Name));
format(String, sizeof(String), "%s [%d]: {FFFFFF}%s", Name, playerid, text); // Assigning a format.
SendClientMessageToAll(GetPlayerColor(playerid), String); // Sending the message with GetPlayerColor, that is the actual color of the player.
return 0; // Ignoring the default text, ending the function.
}
pawn Код:format(String, sizeof(String), "%s [%d]: {FFFFFF}%s", Name, playerid, text);Код:%s and %d are values assigned depending on the player. %s is a letter value (in this case the player's name and the text). %d is a numerical value (ID of the player).Name, playerid & text are the values assigned to %s, %d and %s.pawn Код:format(String, sizeof(String), "%s [%d]: {FFFFFF}%s", Name, playerid, text);
public OnPlayerUpdate(playerid) - Called everytime a client/player updates the server with their status.
Additional information: https://sampwiki.blast.hk/wiki/OnPlayerUpdate
Basic structure:
Example code:pawn Код:public OnPlayerUpdate(playerid)
{
// Code here.
return 1; // If it returns 0 the client will not be updated to others (like paused).
}
"if" is used to determine that if something is happening, the server will execute that function.pawn Код:public OnPlayerUpdate(playerid)
{
if(GetPlayerWeapon(playerid) == 38) return Kick(playerid); // Kicking the player if he is using minigun.
return 1;
}
It would mean something like:
If he is using minigun, kick him!
* Note: using "if" in OnPlayerUpdate may cause lag, this is just an example.
Using return means that the function ends there, with "Kick(playerid);". If you have other code down that function, it will not be executed.
For example:
pawn Код:public OnPlayerUpdate(playerid)
{
if(GetPlayerWeapon(playerid) == 38) return Kick(playerid);
SendClientMessage(playerid, -1, "Updated!"); // Will not be executed if the player is using a minigun.
return 1;
}
Functions:
Basically, most functions names (native functions) describe what the function does; you can find many of them here.
Some basic functions that might be used in a basic gamemode:
SetPlayerPos(playerid, X, Y, Z); - Sets a player position (X, Y & Z are the place where the player will be moved).
Additional information: https://sampwiki.blast.hk/wiki/SetPlayerPos
Example code:
You can save your current position by using the command /Save inside the game (default command by SA-MP). After using this you must go to "\GTA San Andreas User Files\SAMP" and then open the file "savedpositions.txt". There you will find something like:pawn Код:SetPlayerPos(playerid, 0.0, 0.0, 3.0); // Changes player's position to a farm.
Then just copy the red values:pawn Код:AddPlayerClass(270, 700, 700, 5, 0, 0, 0, 0, 0, 0, 0);
* Note: obviously our values are not red, it is just for the example.Код:AddPlayerClass(270, 700, 700, 5, 0, 0, 0, 0, 0, 0, 0);
Then paste those values inside your SetPlayerPos function; like this:
You can also use this system that will do it for you.Код:SetPlayerPos(playerid, 700, 700, 5);
TextDrawCreate(X, Y, text[]) - Creates a textdraw (X & Y are the coords in the screen and "text" is the text that will be shown).
Additional information: https://sampwiki.blast.hk/wiki/TextDrawCreate
Example of textdraw:
An easy way to use this function is using a Textdraw Creator.pawn Код:new Text:Textdraw0;
public OnGameModeInit()
{
Textdraw0 = TextDrawCreate(240.0, 580.0, "SA-MP 0.3z"); // This creates a textdraw without any modification.
return 1;
}
To show a textdraw to a player you should use the function TextDrawShowForPlayer.
Example of use (based on the last example):
To hide a textdraw to a player you must use the function TextDrawHideForPlayer.pawn Код:public OnPlayerConnect(playerid)
{
TextDrawShowForPlayer(playerid, Textdraw0);
}
Example:
And to destroy a textdraw you use the function TextDrawDestroy.pawn Код:public OnPlayerDisconnect(playerid, reason)
{
TextDrawHideForPlayer(playerid, Textdraw0);
return 1;
}
Example:
pawn Код:public OnGameModeInit()
{
TextDrawDestroy(Textdraw0);
return 1;
}
Dialog Function (menus & others):
ShowPlayerDialog(playerid, dialogid, style, caption[], info[], button1[], button2[]); - Shows the player a dialog box.
Additional information: https://sampwiki.blast.hk/wiki/ShowPlayerDialog
* Note: Every dialog needs a unique "dialogid"; unless you do not use that ID inside the public OnDialogResponse (filterscripts and include dialogs must also use a unique dialogid).
There are 4 types of dialog:
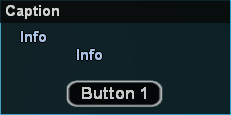
Message box style (sends a message to the player):
Example code (with cancel button):
Every lines has characters; the first line has 77 characters, so we put 77 at the end.pawn Код:if(!strcmp(cmdtext, "/Help", true))
{
new Menu[202]; // This is the number of characters you are using inside your dialog (all characters).
Menu[0]='\0'; // Variable of the dialog, defined before.
strcat(Menu, "This is the text that will be shown inside your dialog. You can add another\n", 77); // 77 is the number of characters in this line.
strcat(Menu, "line using the symbol shown in the upper line (n). You do not need to add\n", 153); // 153 is the number of characters in the other lines plus this line.
strcat(Menu, "that symbol in the last line of your dialog box.", 202); // This are all the characters in your dialog box (202).
ShowPlayerDialog(playerid, 1, DIALOG_STYLE_MSGBOX, "Dialog Help", Menu, "Accept", "Cancel");
return 1;
}
In the second line we have to count the characters in that line plus the characters in all the lines before that line. In this case is 153; so we put 153 at the end.
Example code (without cancel button):
The function "strcat" concatenates (joins together) our Menu string and our text.pawn Код:if(!strcmp(cmdtext, "/Help", true))
{
new Menu[202];
Menu[0]='\0';
strcat(Menu, "This is the text that will be shown inside your dialog. You can add another\n", 77); // strcat concatenates (joins together) our Menu string and our text.
strcat(Menu, "line using the symbol shown in the upper line (n). You do not need to add\n", 153); // Every line uses strcat.
strcat(Menu, "that symbol in the last line of your dialog box.", 202);
ShowPlayerDialog(playerid, 1, DIALOG_STYLE_MSGBOX, "Dialog Help", Menu, "Accept", ""); // We leave the second botton just with "".
return 1;
}
* Note: You can use special websites to count characters.
When counting characters you just count the characters inside the ""; for example:
The \n character also counts.Код:if(!strcmp(cmdtext, "/Help", true)) { new Menu[202]; Menu[0]='\0'; strcat(Menu, "This is the text that will be shown inside your dialog. You can add another\n", 77); strcat(Menu, "line using the symbol shown in the upper line (n). You do not need to add\n", 153); strcat(Menu, "that symbol in the last line of your dialog box.", 202); ShowPlayerDialog(playerid, 1, DIALOG_STYLE_MSGBOX, "Dialog Help", Menu, "Accept", ""); return 1; }
We can also add a function when we press "Accept" or "Cancel" inside the public OnDialogResponse.
For example:
We add a message function inside the public OnDialogResponse:pawn Код:if(!strcmp(cmdtext, "/Help", true))
{
new Menu[202];
Menu[0]='\0';
strcat(Menu, "This is the text that will be shown inside your dialog. You can add another\n", 77);
strcat(Menu, "line using the symbol shown in the upper line (n). You do not need to add\n", 153);
strcat(Menu, "that symbol in the last line of your dialog box.", 202);
ShowPlayerDialog(playerid, 1, DIALOG_STYLE_MSGBOX, "Dialog Help", Menu, "Accept", "");
    return 1;
}
* Note: When using OnDialogResponse every dialog needs a number. In this case we used number 1:pawn Код:public OnDialogResponse(playerid, dialogid, response, listitem, inputtext[])
{
if(dialogid == 1) // Number 1 is the number of our dialog.
{
if(response) // If they clicked 'Accept'.
{
SendClientMessage(playerid, -1, "Thanks for reading!");
}
return 1; // Closing dialog response from dialog # 1!
}
return 1; // Closing the public.
}
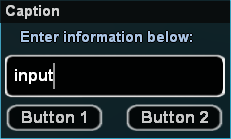
Input style (allows players to input text into the dialog):Код:ShowPlayerDialog(playerid, 1, DIALOG_STYLE_MSGBOX, "Dialog Help", Menu, "Accept", ""); return 1; }
Example code:
After creating our code we must create a function to that code; so we will use the public OnDialogResponse:pawn Код:ShowPlayerDialog(playerid, 2, DIALOG_STYLE_INPUT, "Text", "Write a text for all players!", "Accept", "Cancel");
Example code:
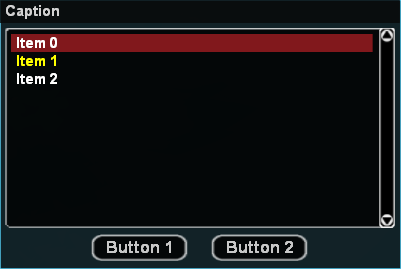
List style (menu, show the player a list of options):pawn Код:public OnDialogResponse(playerid, dialogid, response, listitem, inputtext[])
{
if(dialogid == 2)
{
if(!response) // If they clicked 'Cancel'.
{
SendClientMessage(playerid, -1, "Message canceled!");
}
else // If they pressed 'Accept'.
{
new String[200], Name[MAX_PLAYER_NAME]; // Defining variables.
GetPlayerName(playerid, Name, MAX_PLAYER_NAME); // Getting player's name.
format(String, sizeof(String), "[<!>] Announce from %s: %s", Name, inputtext); // Using a format for the message.
SendClientMessageToAll(-1, String);
}
return 1; // Closing dialog response from dialog # 2!
}
return 1; // Closing the public.
}
Example code (creating a weapon menu):
pawn Код:if(!strcmp(cmdtext, "/Weapon", true))
{
ShowPlayerDialog(playerid, 3, DIALOG_STYLE_LIST, "Weapons", "Desert Eagle\n AK-47\n Combat Shotgun", "Select", "Close");
return 1;
}The \n symbol is used to separate the elements of the list.Код:"Weapons" = Title of the list. "Desert Eagle\n AK-47\n Combat Shotgun" = List. "Select" = Choose a weapon. "Close" = Close the list.
To give the weapon we use the public OnDialogResponse:
Structure of the function GivePlayerWeapon:pawn Код:public OnDialogResponse(playerid, dialogid, response, listitem, inputtext[])
{
if(dialogid == 3)
{
if(response) // If they clicked 'Select' or double-clicked a weapon.
{
switch(listitem) // We create a switch to list all the items; each case is a item from our dialog.
{
case 0:
{
GivePlayerWeapon(playerid, 24, 14); // Give them a desert eagle with 14 bullets.
}
case 1:
{
GivePlayerWeapon(playerid, 30, 120); // Give them an AK-47 with 120 bullets.
}
case 2:
{
GivePlayerWeapon(playerid, 27, 28); // Give them a Combat Shotgun with 28 bullets.
}
}
}
return 1; // Ending the dialog #3.
}
return 1;
}
Additional information about this function: https://sampwiki.blast.hk/wiki/GivePlayerWeaponpawn Код:GivePlayerWeapon(playerid, weaponid, ammo);
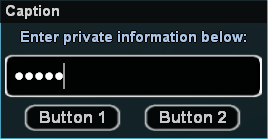
Password style (allows players to input text into the dialog without revealing it):
It has the same structure of "Input style"; mostly used in account systems (it is a bit advanced for this tutorial).
If you want to create an account system you can read this tutorials:
Kush account system guide (Y_INI).
Lorenc_ account system guide (SQLite using rBits).
CREATING AND REMOVING OBJECTS:
There are many programs to create maps for your server; the most known are:
Map editor 1
Map editor 2
MTA map editor
Game Object ID List: https://sampwiki.blast.hk/wiki/Model_ID
Map editor (1 & 2):
Both have the same structure; so this is an explanation for both.
Start using it:
- After dowloading it, you must open the file "editor.exe" and press the button "LOAD".
- It will load the game map (GTA-SA); you can move your camera by moving your mouse while clicking the right mouse button. You can move around the map with the mouse scroll or with the keys "W, A, S & D" while pressing the right mouse button.
Creating objects:
- Move to the place where you want to add your mapping, then press the button "Objects" inside the menu (the menu on the right of the window).
- Press "Add" and search the object you want to add (ID or name); then press double click on it and press the button "Add".
- After doing it press on the object shown on the right of the window and after doing it press "insert".
- You can move the object by using the "Movement" panel.
- After mapping you can get the code and add it to your GM by pressing "Show Code". Copy the code and paste it inside the public OnGameModeInit.
Example code:
Additional information: https://sampwiki.blast.hk/wiki/CreateObjectpawn Код:public OnGameModeInit()
{
CreateObject(2587, 2001.195679, 1547.113892, 14.283400, 0.0, 0.0, 96.0); // Object will render at it's default distance.
return 1;
}
Removing objects:
- Move around the map and search the object you want to delete.
- Click on it and press "Supr".
- After deleting the object press "Show Code". Paste the code inside the public OnPlayerConnect.
Example code:
Additional information: https://sampwiki.blast.hk/wiki/RemoveBuildingForPlayerpawn Код:public OnPlayerConnect(playerid)
{
RemoveBuildingForPlayer(playerid, 3782, 1803.0859, -1294.2031, 34.3438, 0.25);
return 1;
}
MTA map editor:
This program is easier than the other editor.
You can download it here.
* Note: It is able to create objects but not to delete them from the original map.
Start using it:
- After downloading it, open the file MTA.exe
- Click on the map editor.
- To move around the map use the camera and the keys "W, A, S & D".
- To create objects press "F" and click on the cube object (in the bottom):
- Search or select your object and place it on the map.
* Note: You can move it down and up by clicking on the object and using the keys "Page Down (pg dn)" and "Page Up (pg up)". To rotate it use "Shift + Scroll". To change it's angle use "CTRL + Page Down/Page Up" or "CTRL + Arrow keys".
- To save your map press the save button:
- To get the object code you can use a MTA converter:
Delux GTA Map Converter v2 (2015)
Delux GTA Map Converter v2:
- Instead of IPL file format choose PAWN Code for SA-MP. Search your map inside your MTA folder; it is usually inside \mods\deathmatch\resources.
- Copy your code.
Creating Objects:
After having the code of the object(s), you must add it inside the public OnGameModeInit or OnFilterScriptInit.
Example code:
But SA-MP has an object limit of 1000 objects. If you want to optimize your script or you want to add more objects you should use the plugin Streamer.pawn Код:public OnGameModeInit()
{
CreateObject(2587, 2001.195679, 1547.113892, 14.283400, 0.0, 0.0, 96.0); // Object will render at it's default distance.
CreateObject(2587, 2001.195679, 1547.113892, 14.283400, 0.0, 0.0, 96.0, 250.0); // Object will render at 250.0 units (visible at 250 units).
return 1;
}
Streamer installation:
- Dowload it from the streamer plugin thread.
- After downloading it, paste the file "streamer.so" or "streamer.dll" inside the plugins folder (or just paste the plugins folder, the download one, inside your server folder).
- Copy the include "streamer.inc" inside your pawno includes folder.
- Edit the file "server.cfg" inside your server folder and add this line if you are using Windows:
If you are using Linux add:Код:plugins streamer.dll
- Copy this code down all the includes (include example: #include <a_samp>), inside every script that uses streamer:Код:plugins streamer.so
* Note: This code is based on the Streamer plugin update from 2015 (v2.7.4).pawn Код:#include <streamer>
#define STREAMER_TYPE_OBJECT (0)
#define STREAMER_TYPE_PICKUP (1)
#define STREAMER_TYPE_CP (2)
#define STREAMER_TYPE_RACE_CP (3)
#define STREAMER_TYPE_MAP_ICON (4)
#define STREAMER_TYPE_3D_TEXT_LABEL (5)
#define STREAMER_TYPE_AREA (6)
#define STREAMER_AREA_TYPE_CIRCLE (0)
#define STREAMER_AREA_TYPE_CYLINDER (1)
#define STREAMER_AREA_TYPE_SPHERE (2)
#define STREAMER_AREA_TYPE_RECTANGLE (3)
#define STREAMER_AREA_TYPE_CUBOID (4)
#define STREAMER_AREA_TYPE_POLYGON (5)
#define STREAMER_OBJECT_TYPE_GLOBAL (0)
#define STREAMER_OBJECT_TYPE_PLAYER (1)
#define STREAMER_OBJECT_TYPE_DYNAMIC (2)
enum
{
E_STREAMER_ATTACHED_OBJECT,
E_STREAMER_ATTACHED_PLAYER,
E_STREAMER_ATTACHED_VEHICLE,
E_STREAMER_ATTACH_OFFSET_X,
E_STREAMER_ATTACH_OFFSET_Y,
E_STREAMER_ATTACH_OFFSET_Z,
E_STREAMER_ATTACH_R_X,
E_STREAMER_ATTACH_R_Y,
E_STREAMER_ATTACH_R_Z,
E_STREAMER_ATTACH_X,
E_STREAMER_ATTACH_Y,
E_STREAMER_ATTACH_Z,
E_STREAMER_COLOR,
E_STREAMER_DRAW_DISTANCE,
E_STREAMER_EXTRA_ID,
E_STREAMER_INTERIOR_ID,
E_STREAMER_MAX_X,
E_STREAMER_MAX_Y,
E_STREAMER_MAX_Z,
E_STREAMER_MIN_X,
E_STREAMER_MIN_Y,
E_STREAMER_MIN_Z,
E_STREAMER_MODEL_ID,
E_STREAMER_MOVE_R_X,
E_STREAMER_MOVE_R_Y,
E_STREAMER_MOVE_R_Z,
E_STREAMER_MOVE_SPEED,
E_STREAMER_MOVE_X,
E_STREAMER_MOVE_Y,
E_STREAMER_MOVE_Z,
E_STREAMER_NEXT_X,
E_STREAMER_NEXT_Y,
E_STREAMER_NEXT_Z,
E_STREAMER_PLAYER_ID,
E_STREAMER_R_X,
E_STREAMER_R_Y,
E_STREAMER_R_Z,
E_STREAMER_SIZE,
E_STREAMER_STREAM_DISTANCE,
E_STREAMER_STYLE,
E_STREAMER_TEST_LOS,
E_STREAMER_TYPE,
E_STREAMER_WORLD_ID,
E_STREAMER_X,
E_STREAMER_Y,
E_STREAMER_Z
}
- After doing this edit the object code you have. Instead of using "CreateObject" use "CreateDynamicObject".
Example:
Instead of using a normal code...
Use this:pawn Код:public OnGameModeInit()
{
CreateObject(2587, 2001.195679, 1547.113892, 14.283400, 0.0, 0.0, 96.0);
return 1;
}
* Note: You can edit your "CreateObject" code faster by using a ".txt" file. Paste the code inside of it; press "CTRL + R", search "CreateObject" and replace it with "CreateDynamicObject" (use this if your map is very big).pawn Код:public OnGameModeInit()
{
CreateDynamicObject(2587, 2001.195679, 1547.113892, 14.283400, 0.0, 0.0, 96.0);
return 1;
}
- After doing this open the PWN file where you want to add the objects (usually inside the gamemode) and paste your code.
Example code:
Additional information about Streamer plugin.pawn Код:public OnGameModeInit()
{
CreateDynamicObject(2587, 2001.195679, 1547.113892, 14.283400, 0.0, 0.0, 96.0);
return 1;
}


START PRACTICING:
Now you know this, you can practice by editing other scripts or you can try creating your own script.
A good way of starting is editing other gamemodes

If there is any mistake in this guide or something should be added, just post it.
* Note: this is an small guide compared to all the basic information of SA-MP that a new scripter should know; this guide will be updated according to post suggestions on this thread.
Re: Basic SA-MP & Pawn Guide - Dolpin - 04.01.2015
Sorry brother, but have so much tutorials this type, who isn't important...(Sorry my bad english..)
Reply - Ygzeb - 07.01.2015
Quote:
|
Originally Posted by Dolpin
 Sorry brother, but have so much tutorials this type, who isn't important...(Sorry my bad english..)
|
Also, a friend of mine did not understand other tutorials (he is newbie yet), so I decided to create this thread to help him and to help other new scripters.
Re: Basic SA-MP & Pawn Guide - LivingLikeYouDo - 07.01.2015
Quote:
|
Originally Posted by Dolpin
Sorry brother, but have so much tutorials this type, who isn't important...(Sorry my bad english..)
|
On Topic: Really nice job! Many of the new scripters should read this as this is having everything you need to know!
Good job mate, +1.
Re: Basic SA-MP & Pawn Guide - hesambia - 07.01.2015
Veryy Goood ! Best For N00bs

Re: Basic SA-MP & Pawn Guide - $$inSane - 07.01.2015
You must include objects and vehicle management part. Though good job.
Re: Basic SA-MP & Pawn Guide - Arastair - 07.01.2015
Very good tutorial, ignore bitches it's awesome
Re: Basic SA-MP & Pawn Guide - Dolpin - 07.01.2015
Quote:
|
Originally Posted by LivingLikeYouDo
Sorry brother, but can you link me with a tutorial which is exact like this?
On Topic: Really nice job! Many of the new scripters should read this as this is having everything you need to know! Good job mate, +1. |
http://forum.sa-mp.com/showthread.ph...ght=Pawn+guide
http://forum.sa-mp.com/showthread.ph...ght=Pawn+guide
http://forum.sa-mp.com/showthread.ph...ght=Pawn+guide
http://forum.sa-mp.com/showthread.ph...ght=Pawn+guide
http://forum.sa-mp.com/showthread.ph...ght=Pawn+guide
http://forum.sa-mp.com/showthread.ph...ght=Pawn+guide
http://forum.sa-mp.com/showthread.ph...ght=Pawn+guide
http://forum.sa-mp.com/showthread.ph...ght=Pawn+guide
And there are many more
Quote:
|
Originally Posted by Arastair
Very good tutorial, ignore bitches it's awesome
|
@@
I did not say that the tutorial was bad, but be copying and pasting a few things from another tutorial to win '+ rep' worthless, is different.
The Tutorial is good as others, just that.
Re: Reply - HeLiOn_PrImE - 09.01.2015
Quote:
|
Originally Posted by Ygzeb
Basically, most functions (native functions) describe what they do;
|
"Basically, most publics describe what they do within the name; "
You can also add "also known as callbacks in the samp wiki".
I might be asking for to much, but scripting in samp can be confusing especially if the readers don't have our level of english.
This is a very good tutorial, by the way. Good Job!
Reply - Ygzeb - 12.01.2015
Quote:
|
Originally Posted by HeLiOn_PrImE
You should correct with this:
"Basically, most publics describe what they do within the name; " You can also add "also known as callbacks in the samp wiki". I might be asking for to much, but scripting in samp can be confusing especially if the readers don't have our level of english. This is a very good tutorial, by the way. Good Job! |
The vehicle part has been removed; probably I will create an additional guide for those who want to keep learning, explaining information that could not be explained here due to the length of this guide. The additional guide will contain information about commands, vehicles, conditions, etc.
Thanks everyone for feedback
